
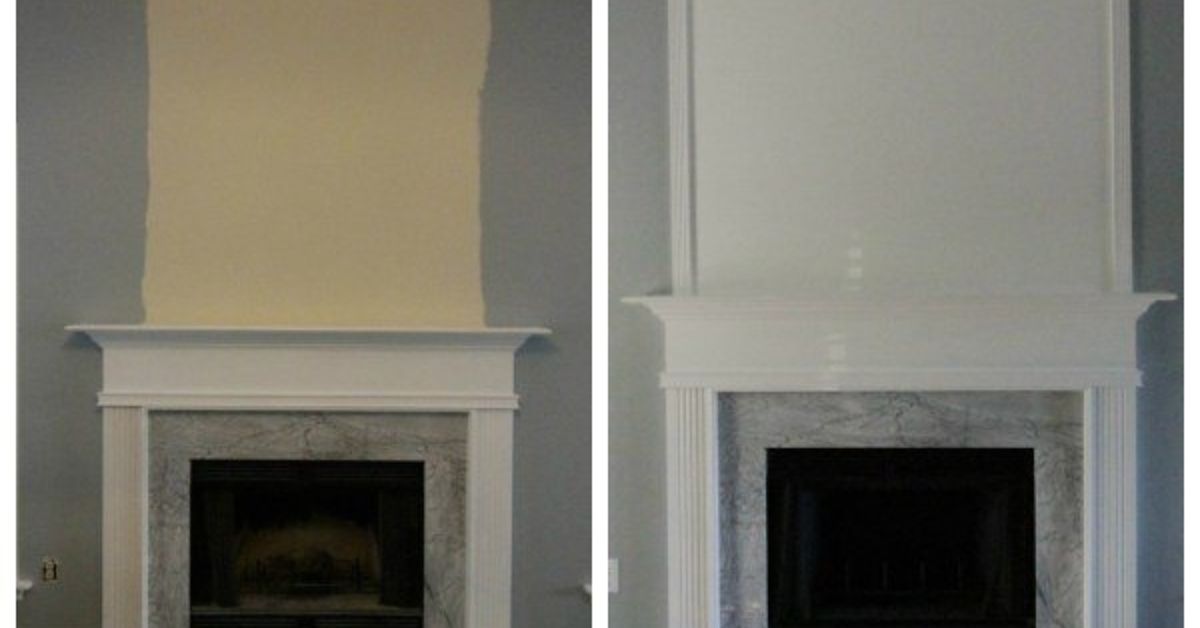
A fireplace has a strange amount of authority in a room. It can be completely cold, filled with decorative birch logs, and still somehow act like it owns the place. When the fireplace looks dated, the entire living room can feel stuck in a previous decade goose figurine.
The good news is that a dramatic fireplace makeover does not always require a demolition crew, a second mortgage, or a television production team yelling, “Move that bus!” A simple DIY fireplace update can completely change the personality of a room with paint, a better mantel, new tile, improved styling, or a combination of small upgrades that look far more expensive than they actually are.
This guide explores practical ways to create a high-impact fireplace makeover while keeping the project realistic for a motivated homeowner. Whether you have an old brick fireplace, dated ceramic tile, a builder-grade mantel, or a nonworking hearth that mostly collects dust bunnies, there is a smart way to give it a fresh new life.
Why a Simple Fireplace Update Can Look So Dramatic
A fireplace is usually the visual anchor of a living room. It sits in a central location, often has height, texture, and architectural detail, and naturally draws the eye. That means even a small change can have an outsized effect.
Think of your fireplace as the room’s lead actor. The sofa, rug, lamps, and side tables may all be talented supporting characters, but the fireplace tends to walk onto the stage wearing a giant hat. Updating it can make the rest of the room feel more intentional without replacing every piece of furniture you own.
The most successful DIY fireplace updates usually rely on one big visual idea rather than ten competing ones. A painted brick fireplace can feel clean and modern. A chunky wood mantel can add warmth to a plain surround. Tall tile can make a low ceiling feel higher. A limewashed finish can soften harsh red brick while preserving texture. The goal is not to make the fireplace scream for attention. The goal is to make it look like it always belonged there.
Start With a Fireplace Reality Check
Before buying paint, tile, trim, or an aggressively oversized mirror, determine what kind of fireplace you have. Is it wood-burning, gas, electric, decorative-only, or an older fireplace that has not been used since people still rented DVDs?
This matters because cosmetic updates are one thing, while changes around heat-producing components are another. A working wood-burning or gas fireplace has rules about clearances, combustible materials, ventilation, and approved finishes. Never alter the firebox, chimney, flue, gas line, venting system, electrical wiring, or appliance housing as part of a casual weekend project.
Before beginning a DIY fireplace makeover, review the manufacturer’s instructions for your fireplace insert or gas unit. Local building codes may also affect mantel placement, surround materials, and the distance between heat sources and combustible finishes. When in doubt, ask a qualified fireplace installer, chimney professional, electrician, or contractor before moving forward.
Questions to Ask Before You Begin
- Is the fireplace currently functional?
- Does the brick, tile, mortar, or drywall have cracks, loose sections, or smoke damage?
- Will the new materials be exposed to heat?
- Does the fireplace manufacturer specify clearance requirements?
- Are you changing only the appearance, or also changing the structure?
- Will your update affect a gas insert, electrical outlet, TV wiring, or ventilation?
A cosmetic project should stay cosmetic. That may sound obvious, but fireplaces have a special talent for turning a “quick Saturday project” into a three-week mystery involving masonry dust and a missing drill bit.
Choose One High-Impact DIY Fireplace Update
You do not need to do everything at once. In fact, choosing one major update often creates a cleaner, more dramatic result than piling on tile, paint, shiplap, corbels, sconces, trim, and six decorative lanterns all at the same time.
1. Paint an Old Brick Fireplace
Painting is one of the simplest and most affordable ways to update a brick fireplace. A dark red, orange, or heavily stained brick surround can make a room feel heavy, especially when paired with outdated trim or bulky furniture. A fresh painted brick fireplace can instantly brighten the space and make the mantel, artwork, and surrounding furnishings feel more current.
White is popular because it reflects light and creates a clean backdrop. Soft gray, charcoal, deep green, navy, and warm taupe can also create a sophisticated look. A darker fireplace can be especially dramatic in a room with pale walls and natural wood accents.
Preparation matters more than people want it to. Brick has texture, dust, soot, and little mortar craters that seem personally determined to swallow your paintbrush. Clean the surface thoroughly, repair minor damage as appropriate, protect surrounding floors and walls, and use a masonry-compatible primer and paint system.
Do not paint inside the firebox unless a qualified professional has confirmed the proper product and application. Regular interior paint is not meant for direct flame exposure. The firebox is not the place to test your artistic courage.
2. Whitewash or Limewash Brick for a Softer Look
If fully painted brick feels too permanent, whitewash or limewash can offer a more relaxed alternative. These finishes allow some of the original brick color and texture to show through, creating a softer, more layered appearance.
Whitewashing works especially well in farmhouse, cottage, coastal, traditional, and transitional interiors. It can tone down intense red brick without erasing all of its character. The result often looks weathered in a charming way, like the fireplace has been quietly living its best life in a European cottage for the past hundred years.
Test your finish in a small, less-visible section first. The final appearance depends on the brick’s porosity, color variation, and surface condition. A sample board is helpful, but the actual fireplace is the real boss here.
3. Replace a Thin Mantel With a Chunkier One
A mantel is often the easiest way to make a fireplace feel more substantial. Many builder-grade fireplaces have narrow shelves that look like they were designed to hold one candle and a framed photo of someone’s nephew. Replacing that shelf with a thicker wood beam, painted mantel, stone slab, or custom floating shelf can completely change the fireplace’s proportions.
For a rustic look, choose a stained wood beam with visible grain. For a more polished style, use a painted mantel with simple trim and clean edges. A warm medium wood tone can balance a white fireplace surround, while a painted mantel can tie the fireplace into nearby built-ins, doors, or window trim.
Measure carefully before installing anything. A mantel should feel visually connected to the width of the firebox and surrounding wall, not too tiny and not so wide that it looks like it is attempting to dock a small boat. Secure installation is essential, especially for heavy wood, stone, or reclaimed materials.
4. Update the Fireplace Surround With Tile
Tile is a powerful option for a dramatic fireplace update because it brings color, pattern, texture, and height into the room. You can use large-format porcelain tile for a modern look, handmade-look ceramic tile for warmth, marble-inspired tile for classic elegance, or a geometric pattern for a more playful design.
One of the easiest ways to make a fireplace feel taller is to extend tile above the mantel or all the way to the ceiling. Vertical layouts, stacked tile, fluted textures, and narrow rectangular tile can make a standard fireplace look much more architectural.
Dry-fit your tile layout before applying adhesive. This helps prevent awkward slivers of tile at the edges, uneven spacing, or the classic DIY surprise where the final tile is somehow both too large and too small at the same time. Use materials and installation methods appropriate for the heat exposure and location of your fireplace.
For a nonworking fireplace or a decorative electric unit, peel-and-stick tile may be an easy short-term visual upgrade in a cooler surrounding area. For a functional fireplace, do not assume a peel-and-stick product is safe near heat. Always verify the manufacturer’s rating and placement recommendations.
5. Add Trim, Paneling, or a Feature Wall Above the Fireplace
The wall above a fireplace is valuable design real estate. Adding simple picture-frame molding, vertical paneling, board-and-batten, or painted trim can make the fireplace feel custom without rebuilding the entire surround.
A classic approach is to paint the fireplace, mantel, trim, and wall behind it in the same color. This creates a cohesive, built-in effect and lets the architectural details do the talking. Another option is to use a contrasting wall treatment above the mantel, such as dark painted paneling behind a light stone surround.
Keep the treatment balanced. If the fireplace already has busy stone or patterned tile, simpler wall details usually work best. If the fireplace is plain and flat, a little trim or paneling can add the personality it has been missing.
A Simple DIY Fireplace Makeover Plan
A successful fireplace update usually follows a straightforward order. Planning the sequence saves time, reduces mess, and prevents the annoying moment when you realize your fresh paint is now covered in tile dust.
Step 1: Define the Look
Choose a style direction before buying materials. Consider modern organic, cozy traditional, modern farmhouse, classic cottage, Scandinavian, vintage-inspired, or dramatic contemporary. Save a few examples that have a similar fireplace shape and room size to yours.
Do not copy every detail from a large designer home with 18-foot ceilings if your living room has an 8-foot ceiling and a ceiling fan that could qualify as a weather system. Borrow the color palette, proportions, and mood instead.
Step 2: Make a Mood Board
Collect paint colors, mantel finishes, tile options, flooring samples, and fabric swatches. Place them together before committing. A tile that looks elegant under store lighting can suddenly look like wet oatmeal when paired with your existing beige carpet.
Step 3: Protect the Room
Cover floors with drop cloths, remove nearby decor, tape off edges, and protect furniture from dust. Fireplace projects tend to create more mess than expected because mortar dust and brick crumbs have excellent survival instincts.
Step 4: Repair and Clean
Clean brick, tile, stone, or painted surfaces thoroughly. Remove loose grout, repair small cracks where appropriate, and make sure the surface is dry before applying primer, paint, adhesive, or tile. A beautiful finish cannot hide a loose substrate forever.
Step 5: Complete the Major Surface Update
Paint the brick, install tile, whitewash the surround, or add paneling. Work from the highest and messiest steps toward the cleaner finishing steps. Let each product cure according to its instructions before adding additional layers or decorations.
Step 6: Install or Refresh the Mantel
Once the main surface is complete, add the mantel or repaint the existing one. Use a level, proper hardware, and secure attachment points. A crooked mantel will become the one thing your eyes notice every single time you enter the room. It is basically the home-improvement equivalent of a picture frame hanging one inch too low.
Step 7: Style the Fireplace Last
Artwork, mirrors, candlesticks, books, vases, greenery, and fireplace tools should be the final layer. Styling is where you make the fireplace feel lived-in rather than staged for a catalog where no one has ever misplaced a remote control.
Three Easy Fireplace Makeover Ideas
Modern Painted Brick Fireplace
Paint an old brick fireplace in a warm white or soft greige. Add a medium-tone oak mantel, a large landscape painting, and a simple black fireplace screen. This look works well when the room needs more light but you still want warmth and texture.
Moody Tile Fireplace Surround
Use large-format charcoal or deep green tile around the fireplace surround. Pair it with a simple painted mantel in a matching dark shade and light walls around the room. The dark fireplace becomes a dramatic focal point without making the whole space feel gloomy.
Warm Cottage Whitewash
Whitewash red brick so the original texture remains visible. Add a reclaimed wood mantel, ceramic vases, brass candlesticks, and a vintage-style mirror. This approach feels collected, relaxed, and forgiving of small imperfectionswhich is helpful because real life contains fingerprints, pet hair, and approximately eleven mystery crumbs.
How to Style a Finished Fireplace
Once the DIY fireplace update is complete, resist the urge to overcrowd the mantel. A fireplace should look warm and personal, not like a gift shop had a minor accident.
Start with one anchor piece, such as a mirror, framed artwork, or sculptural object. Then add smaller accents with different heights and textures. A vase with branches, a stack of books, a ceramic bowl, or a pair of candlesticks can create visual balance without making the mantel feel cluttered.
If your fireplace is nonworking, the firebox can still look intentional. Decorative logs, flameless candles, stacked books, a woven basket, or a clean fireplace screen can turn an empty opening into a feature rather than a sad little cave in the wall.
Common DIY Fireplace Update Mistakes to Avoid
The most common mistake is choosing a design before considering safety and function. A working fireplace is not just a decorative wall feature. It produces heat, requires ventilation, and may have specific clearance requirements.
Another mistake is skipping preparation. Dirty brick, loose tile, damaged grout, cracked mortar, and glossy surfaces can all cause paint or adhesive to fail. The glamorous before-and-after photo rarely shows the cleaning, sanding, patching, and priming, but that unglamorous work is what makes the finish last.
Finally, avoid chasing every trend. A fireplace is a large architectural feature, and it is more expensive to reverse than a throw pillow. Choose colors, materials, and proportions that work with your home’s style instead of copying a trend that may feel tired by next spring.
Final Thoughts: Small Changes, Big Fireplace Energy
A simple but dramatic DIY fireplace update is less about spending the most money and more about making a few smart design decisions. Paint can brighten old brick. Tile can add height and texture. A new mantel can change the entire scale of the room. Thoughtful styling can make the finished fireplace feel like the heart of the home again.
Start with the safest, simplest change that will make the biggest visual difference. You may be surprised by how much a fireplace makeover transforms not only the wall itself, but the way the entire room feels. Sometimes all it takes is a little paint, a better mantel, and the courage to finally retire that 1994 beige tile.
Real-Life Experiences With a Simple but Dramatic DIY Fireplace Update
The first thing many people notice after updating a fireplace is not the paint color, tile pattern, or new mantel. It is the strange feeling that the whole room suddenly makes more sense. Before the update, the furniture may have looked mismatched, the rug may have felt too small, and the wall decor may have seemed random. After the fireplace changes, everything around it often appears more intentional. The room did not become larger overnight, but it somehow starts behaving like it did.
One homeowner might begin with a red brick fireplace that feels heavy and dated. The brick is not necessarily ugly; it is simply competing with every other visual element in the room. After cleaning the surface, applying primer, and painting the brick a warm off-white, the entire living room can feel brighter. The old brown sofa may suddenly look cozy instead of tired. The wood floors may look richer. Even the same curtains can appear more expensive. This is the magic trick of a fireplace makeover: it changes the background, and the background changes everything else.
Another common experience happens with old tile. Many homes have fireplaces surrounded by small square tiles in shades of beige, brown, burgundy, or mysterious peach. These tiles may not be objectively terrible, but they can make a room feel locked into a very specific era. Updating the surround with larger tile, a softer neutral color, or a more modern vertical layout can make the fireplace feel taller and cleaner. The visual difference is often dramatic because the eye stops focusing on dozens of little grout lines and starts seeing one strong architectural feature.
Installing a new mantel can also be surprisingly emotional. A mantel is more than a shelf. It is where holiday stockings hang, birthday cards collect, family photographs appear, and random mail occasionally goes to retire forever. Replacing a thin builder-grade shelf with a chunky stained beam or painted wood mantel can make the fireplace feel more substantial and more personal. Suddenly, the room has a place for a favorite piece of art, a vase of branches, or a few candles that make even a Tuesday night feel slightly more civilized.
Of course, DIY projects also come with reality checks. Paint may look darker at night. A tile pattern may require more cuts than expected. A mantel may need to be adjusted three times before it looks level, even when the level insists it is level. There may be dust in places that seem physically impossible, including inside a closed cabinet on the other side of the room. These moments are part of the experience.
The most satisfying part usually comes at the end, when the drop cloths are removed and the room is cleaned. The fireplace is no longer a dated feature you try to ignore. It becomes the first thing guests notice, the place where furniture naturally gathers, and the background for quiet evenings at home. A simple DIY fireplace update can prove that dramatic design does not always require a dramatic budget. Sometimes it just requires a plan, a little patience, and enough painter’s tape to wrap a small car.














